Guided soft-tissue emergence profile techniques using CAD/CAM technologies: Multiple case reports
December 14, 2018 / Categories: Digital Dentistry, Implant Dentistry
Brenes, Christian
Renne, Wally
Abstract
Objective
The following article describes 2 original techniques that use CAD/CAM technology to generate a pre-surgical healing abutment or provisional restoration.
Materials and methods
Two clinical cases are described using different techniques to create a guided soft-tissue emergence profile using a pre-surgical custom healing abutment or provisional restoration and their benefits. The first case describes the use of digital libraries with pontic emergence profiles. The 3-D object (tooth) is manipulated to replicate or to establish a natural contour that will determine the shape of the soft tissue during the healing process. The second technique describes the use of segmentation and mirroring of a natural tooth to generate an exact replica and emergence profile of the patient’s dentition.
Conclusion
These techniques constitute a very simple and efficient way of generating a pre-surgical customized healing abutment or provisional restoration that allows the clinician to guide the soft-tissue healing process and emergence profile immediately after the surgery. The techniques are developed not to be software-specific, but rather to be used with any free or paid open architecture software.
Keywords
CAD/CAM; guided surgery; 3-D printing; segmentation; digital wax-up.
Introduction
Since 1989, Smith and Zarb incorporated appearance into the criteria for dental implant success.1Smith D, Zarb G. Criteria for success of osseointegrated endosseous implants. → J Prosthet Dent. 1989 Nov;62(5):567–72. Decades of evidence supports the importance of generating implant-supported esthetic restorations, with little attention to improving the soft-tissue emergence profiles or natural contours of the teeth.2DeRouck T, Collyns K, Wyn I, Cosyn J. Instant provisionalization of immediate single-tooth implants is essential to optimize esthetic treatment outcome. → Clin Oral Implants Res. 2009 Jun;20(6):566–70. Immediate provisional restorations are generally a good way to manage soft-tissue contours, aiding during the healing process with obvious esthetic benefits. Several authors have reported great results during decades of using traditional provisional techniques by minimally altering the biology of the soft tissue during the healing process.3Gamborena I, Blatz MB. Evolution: contemporary protocols for anterior single-tooth implants. → Chicago: Quintessence; 2015. 618 p. The main limitation of traditional techniques is the chair time needed during or after the surgical procedure to fabricate such provisional restorations; when determining the efficiency of a protocol, the time factor is critical and most clinicians choose standard cylindrical abutments to guide tissue contours before the final impression. Abrahamsson et al. reported that subsequent disconnections and reconnections of abutment components might compromise the mucosal barrier, and this could lead to retraction or apically positioned connective tissue due to increased bone remodeling.4Abrahamsson I, Berglundh T, Lindhe J. The mucosal barrier following abutment dis/reconnection. An experimental study in dogs. → J Clin Periodontol. 1997 Aug;24(8):568–72. In addition, most cylindrical and unnatural emergence profiles could lead to food impaction and possible biological complications due to poor emergence profiles, food impaction and potential periimplantitis.
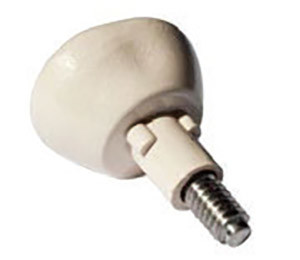
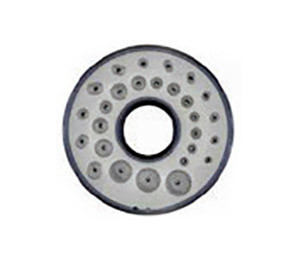
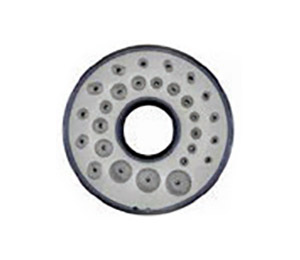
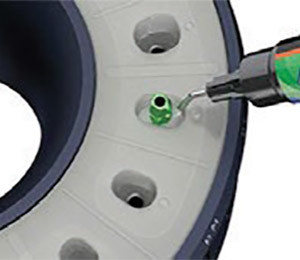
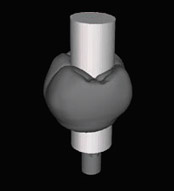
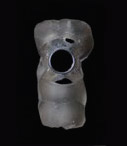
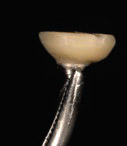
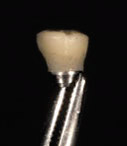
In the past, several authors described accelerated dental implant protocols such as immediate placement and immediate provisionalization.5DeRouck T, Collyns K, Wyn I, Cosyn J. Instant provisionalization of immediate single-tooth implants is essential to optimize esthetic treatment outcome. → Clin Oral Implants Res. 2009 Jun;20(6):566–70.,6Lazzara RJ. Immediate implant placement into extraction sites: surgical and restorative advantages. → Int J Periodontics Restorative Dent. 1989;9(5):332–43. Recently, some companies have developed anatomical healing abutments that, in contrast to custom healing abutments, have an anatomical shape based on average standardized healing profiles. Systems such as Contour Healer (Common Sense Dental Products), which are anatomical PEEK abutments that can be shaped, and the VPI EPI mold system (VP Innovato Holdings), which helps fabricate composite anatomical abutments from a silicone mold, are among the most popular systems. The limitations of using such analogue systems are reliance on the limited implant brands they are compatible with, the healing process not being guided from the emergence profiles of the final restoration or wax-up, and being able to fabricate healing abutments only, but not provisional crowns (Figs. 1 & 2A & B).
The use of CAD/CAM technologies has offered different techniques to generate custom restorations. Most systems allow for the scanning of scan bodies after implant placement to generate an implant-supported provisional restoration, but this technique only allows the clinician to generate the provisional restoration after the surgery. The use of guided surgery in combination with pre-surgical customized healing abutments or provisional restorations with natural emergence profiles can provide the clinician with a very cost-effective and predictable way of replicating nature and minimizing soft-tissue trauma.
Two different techniques are described for the creation of a pre-surgical custom healing abutment or provisional restoration. The first case describes the use of digital libraries with pontic emergence profiles. The 3-D object (tooth) is manipulated to replicate or to establish a natural contour of a tooth. The second technique describes the use of segmentation and mirroring of a natural tooth to generate an exact replica and emergence profile of the patient’s dentition.
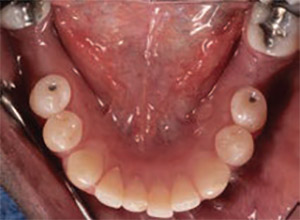
Clinical case 1
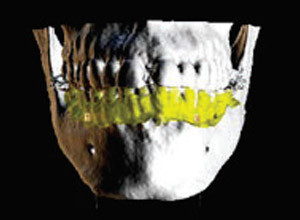
A 52-year-old man presented to the Dental College of Georgia at Augusta University, Augusta, Georgia, U.S., with the chief complaint of 2 missing posterior teeth (Fig. 3). During the first appointment, clinical and radiographic examinations were completed for proper diagnosis and formulation of treatment plan. The periodontal condition was stable, no endodontic lesions were found, and the patient reported good hygiene. After proper diagnosis, it was determined that the patient could be a candidate for dental implant therapy. Digital impressions were taken using the Medit i500 intraoral scanner (Medit), along with a CBCT scan. With the diagnostic information acquired, the data were imported into the free implant planning software used in this case (Blue Sky Plan, Blue Sky Bio) and the STL model aligned to the DICOM volume using match points (Fig. 4).
The following steps describe the technique of using digital libraries for a pre-surgical custom healing abutment or provisional restoration:
-
-
Fig. 1
Contour Healer PEEK abutment.

-
-
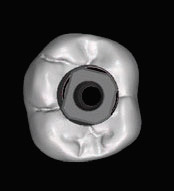
Fig. 2A
VPI EPI system.
-
-
Fig. 2B
VPI EPI system.

-
-
Fig. 4
STL model aligned to DICOM 3-D reconstruction.

-
-
Fig. 3
Intraoral occlusal view of missing teeth #36 and 46.
-
- Fig. 5A
-
- Fig. 5B
Digital wax-up using Brenes pontic library of tooth #35 owing to lack of mesiodistal space to replace tooth #36.
Fig. 5B
Digital wax-up using Brenes pontic library of tooth #46 to recreate the desired natural emergence profile.
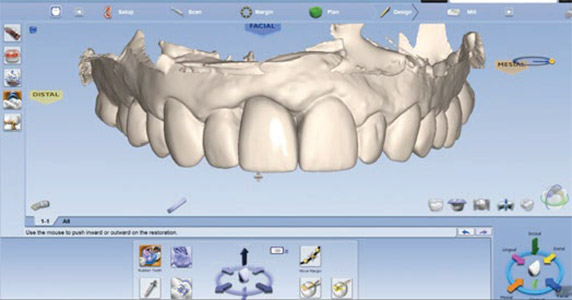
- A 3-D wax-up is fabricated in the implant planning software. In this case, the Brenes pontic library was used to recreate the natural emergence profile of the restorations (Figs. 5A & B).
- Proper implant planning and positioning is done. In this case, 2 NobelReplace Conical Connection implants (Nobel Biocare) were planned with their corresponding digital temporary abutments to visualize the final position of the screw access holes (Figs. 6A–C).
- The digital wax-up and temporary abutments are exported from the open architecture software (Blue Sky Plan) in STL format and the files imported into Meshmixer (Autodesk) or any software that allows for 3-D data manipulation (Fig. 7).
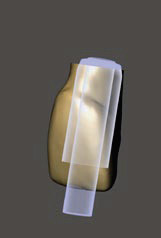
- A cylinder that has the same width of the temporary abutment is generated and positioned according the position of the restoration (Fig. 8).
- The crown and the cylinder are selected and a Boolean difference function is performed to subtract the cylindrical shape from the crown (Figs. 9A & B).
- Alternatively, the provisional restoration is cut using the plane cut function to generate a healing abutment or a provisional restoration with flat anatomy that is not going to be in occlusion (Fig. 10).
- The new restoration, with an occlusal access hole, is exported as an STL binary file to be manufactured.
- The restoration can be manufactured by means of milling technologies using PMMA, can be printed with biocompatible materials, or printed and used as a scaffold for a composite healing abutment (Figs. 11A & B, 12).
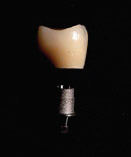
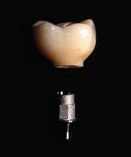
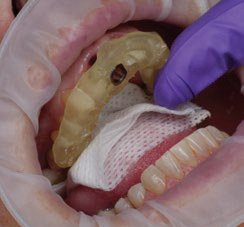
Two surgical guides (1 for each side) were exported from Blue Sky Plan software and printed using the Asiga MAX printer (Asiga) and NextDent SG resin (NextDent; Fig. 13). The pre-surgical custom healing abutments were printed using NextDent C&B MFH resin and attached with premise flowable composite (Kerr Dental) to the temporary nonengaging abutments. The remaining metal structure of the temporary abutments was cut with a diamond disc and polished (Figs. 14A & B).
Fig. 6A
Implant planning of 2 implants (NobelReplace Conical Connection) in positions #36 and 46.Figs. 6B & C
Proper implant planning with corresponding digital temporary abutments.Fig. 7
Teeth with temporary abutments to visualize the final position of the screw access holes.
-
-
Fig. 8
Tooth with generated cylinder in Meshmixer.
-

-
Fig. 9A
Hole created on tooth after Boolean difference operation.
-
-
Fig. 9B
Tooth with generated cylinder in Meshmixer.strong>
Contour Healer PEEK abutment.
-

-
Fig. 10
Healing abutment created after cutting the tooth with the plane cut function in Meshmixer.
-
-
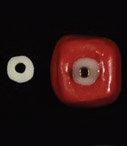
Fig. 11A
Occlusal view of printed healing abutments seated on the nonengaging temporary abutments.
-

-
Fig. 11B
Lateral view of printed healing abutments seated on the nonengaging temporary abutments and their emergence profiles.
-
-
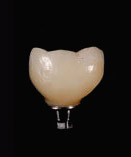
Fig. 12
Alternative copy of printed pre-surgical custom healing abutment using putty and flowable composite to copy the emergence profile.
-
-
Fig. 13
Printed surgical guide with metal cylinder.
-
-
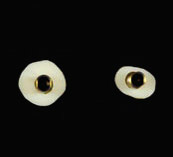
Fig. 14A
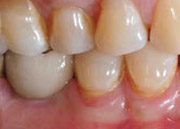
Pre-surgical healing abutment for tooth #46.
-
-
Fig. 14B
Pre-surgical healing abutment for tooth #36 with a premolar shape owing to lack of restorative space.
-
-
Fig. 15
Intraoral occlusal view of pre-surgical healing abutments immediately after surgical procedure.
-
-
Fig. 16
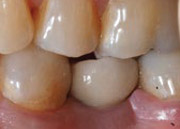
Intraoral occlusal view of the natural emergence profiles of the tissue 3 months post-surgery.
-
-
Fig. 17A
Lateral view of final restorations and Ti-bases.
-
-
Fig. 17B
Lateral view of final restorations and Ti-bases.
-

-
Fig. 17C
Frontal view of final restorations cemented on Ti-bases.
-
-
Fig. 17D
Frontal view of final restorations cemented on Ti-bases.
-

-
Fig. 18
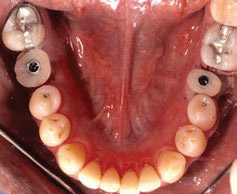
Intraoral occlusal view of final screw-retained restorations.
-
-
Fig. 19A
Lateral view of final screwretained restorations.
-
-
Fig. 19B
Lateral view of final screwretained restorations.
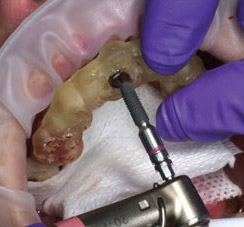
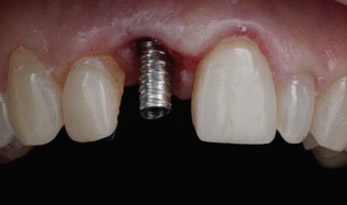
Two horizontal incisions were made over the edentulous ridges after a proper anesthetic effect was achieved; no vertical incisions were required for a flapless approach. The surgical guide was used to create 2 guided osteotomies using a set of guided stoppers (Digital Dentistry Education) in conjunction with Densah drills (Versah) to place 2 4.3 × 11.5 mm implants (NobelReplace Conical Connection) in positions #36 and 46. Excellent primary stability was achieved and the 2 pre-surgical custom healing abutments screwed in place (Fig. 15).
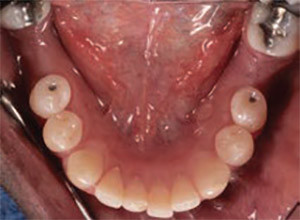
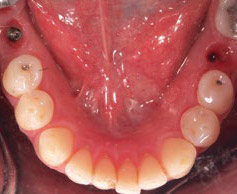
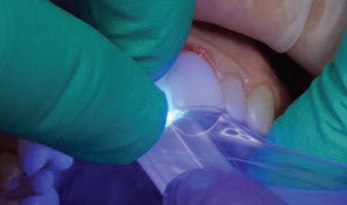
Three months later, the custom healing abutments were removed for the final impression, the natural emergence profile of the tissue was created and the tissue was healthy (Fig. 16). An intraoral digital impression was taken to capture the natural emergence profile of the soft tissue using the Medit i500 and Nobel-compatible intraoral DESS scan bodies (DESS). Two screw-retained crowns were designed using Exocad (Exocad) over 2 DESS Ti-bases and cemented with Maxcem Elite Chroma resin cement (Kerr Corporation; Figs. 17A–D).
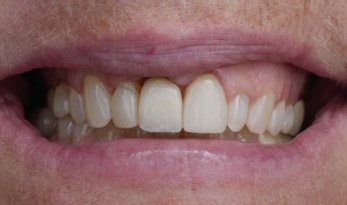
At the delivery appointment, the final restorations were torqued following the manufacturer’s recommendation, and the access screw channel was covered with PTFE tape and composite resin. The occlusion was checked and the patient was satisfied with the treatment outcome (Figs. 18, 19A & B).
Clinical case 2
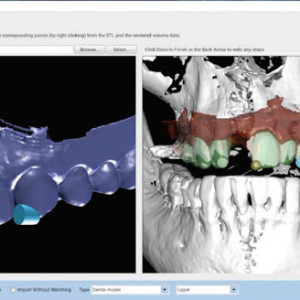
A 56-year-old patient presented to the Medical University of South Carolina with the chief complaint of a missing anterior tooth (Fig. 20). After a thorough, but unremarkable health history and clinical examination, an intraoral digital impression was taken (Planmeca Emerald, Planmeca) at the consultation appointment and an ultralowdose CBCT scan (Planmeca ProMax 3D Max) was also taken (Fig. 21). A mirror of the patient’s tooth #9 was waxed into site #8 using the mirror contralateral tooth feature in Planmeca Romexis Version 5.2 (Planmeca; Fig. 22). The intraoral scan and wax-up were merged with the CBCT scan and an Astra Tech OsseoSpeed EV implant (Dentsply Sirona) was planned, the adjacent root segmented and a surgical guide created. All elements were exported into Meshmixer, and the adjacent root was mirrored and then merged with the original wax-up of tooth #11. Boolean difference was then used to cut a perfect hole in the digital design. The restoration was then imported into the Planmill 30S ( Planmeca) and milled out of a resin nanoceramic material (Lava U, 3M). Custom resin stains were used (Light Art, Bisco).
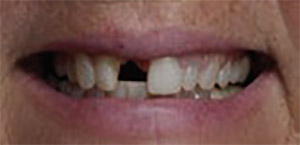 Fig. 20
Patient preoperative condition.
The guided soft-tissue emergence profile techniques using the segmentation approach can be done using the following steps:
- A digital wax-up is produced on the basis of an intraoral digital impression. The digital wax-up in the edentulous space is made using an exact mirror image of the contralateral tooth in Planmeca Romexis Version 5.2 (Fig. 22).
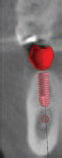
- The intraoral digital impression and the wax-up are merged with the CBCT scan using common data points and then a best-fit algorithm is utilized to merge the 2 data sets (Fig. 23). Proper digital planning and implant placement are performed. In this case, the implant was placed 3 mm apical to the cementoenamel junction of the wax-up and 2 mm palatal (Fig. 24). The corresponding manufacturer’s temporary abutment was designed in the Planmeca Romexis abutment editor and attached to the digital plan (Fig. 25).
- The surgical guide is exported and then manufactured (Fig. 26).
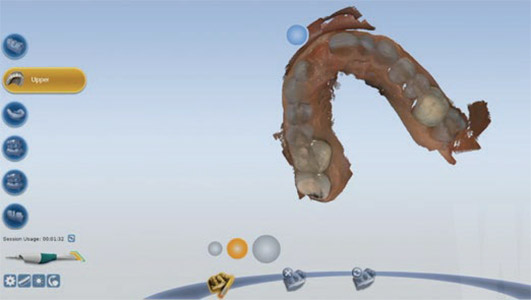
- The contralateral tooth and root were then isolated and segmented using a fairly automated tooth segmentation feature in Planmeca Romexis (Fig. 27).
- All elements are exported as STL files, including the implant location, abutment, surgical guide, intraoral scan, mirror tooth wax-up and contralateral root.
- Using Meshmixer, a mirror image of the segmented root is produced and then merged with the digital wax-up (Figs. 28–30).
- The new mesh is made solid and sliced right at the location of the margin in the exported abutment from the implant planning software (Fig. 31).
- The crown and the cylinder are selected and a Boolean difference function is performed to subtract the cylindrical shape from the crown (Fig. 32).
- The new restoration is exported for additive or subtractive manufacturing and the fit verified on the temporary abutment (Fig. 33). Owing to timing, the restoration is not attached to the abutment until the day of surgery.
- Therefore, after the initial consultation and data collection, a surgical guide is printed and a pre-surgical provisional restoration is fabricated using a mirror image of both the clinical crown of the contralateral tooth and the root to gain a natural emergence profile.
- The surgical guide in this case was exported from Planmeca Romexis and printed using Dental LT Clear Resin (Formlabs) with the Form 2 printer (Formlabs).
-

-
Fig. 21
Image captured from Planmeca Emerald scanning module.
-

-
Fig. 22
Mirror contralateral tooth feature.
-
-
Fig. 23
Software best algorithm alignment using the 3 common points of the intraoral impression STL and CBCT scan.
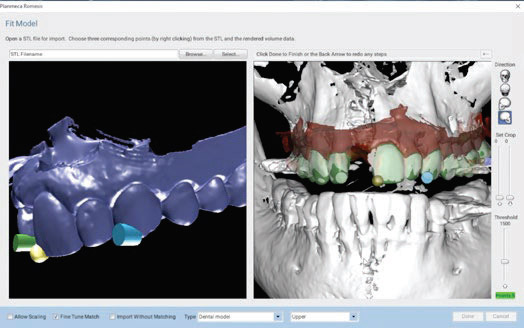
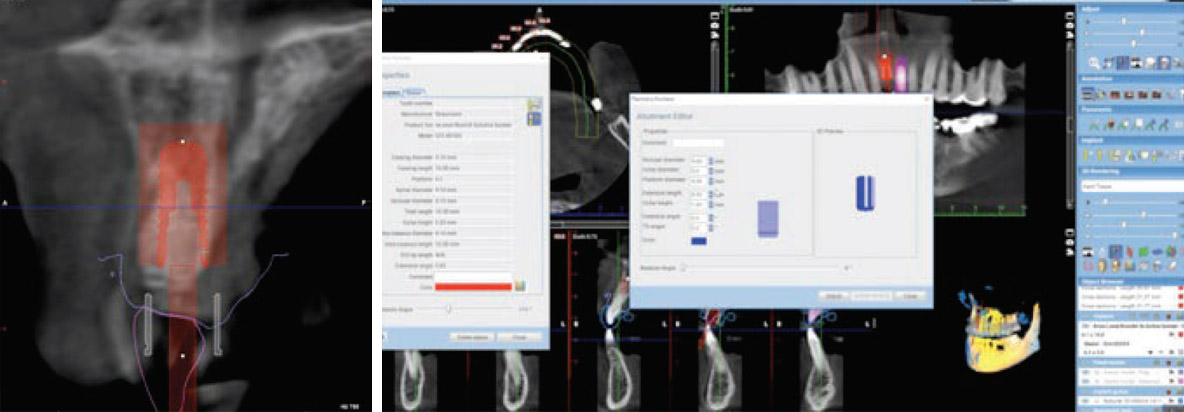
Fig. 24
Virtual implant placement.
Fig. 25
Abutment design in Planmeca Romexis abutment editor.
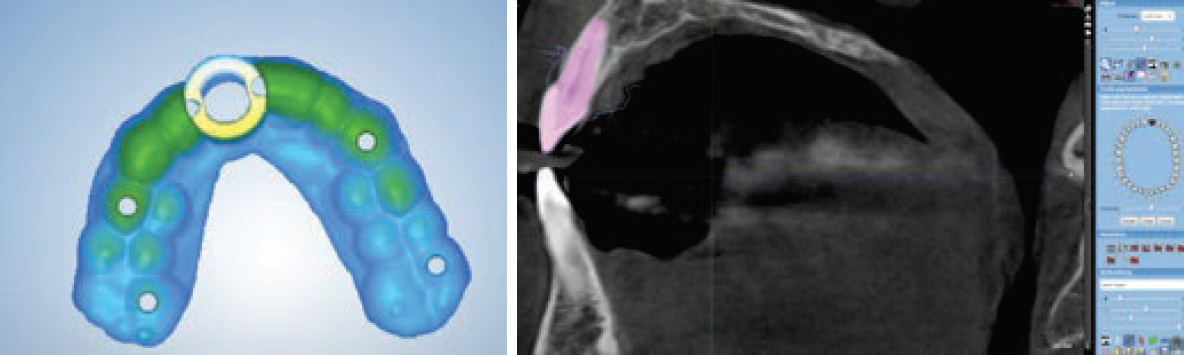
Fig. 26
Planmeca Romexis surgical guide module.
Fig. 27
Tooth segmentation feature in Planmeca Romexis.

Fig. 28
Segmented tooth and root mirrored and then overlaid in Meshmixer.
Fig. 29
Combined CBCT segmented tooth and digital wax-up.
Fig. 30
Sectioned tooth at the margin of the abutment.
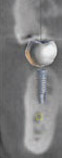
During the surgical procedure the guide is evaluated for fit, and a flapless approach is taken (Fig. 34). After the osteotomy the implant is placed through the guide to the proper depth (Figs. 35 & 36). The manufacturer’s temporary abutment is seated, the custom pre-surgical provisional restoration is seated and flowable resin composite is injected around the space of the provisional restoration and abutment (Figs. 37 & 38). The restoration is removed, polished and reseated for delivery (Fig. 39), and the access screw channel is covered with PTFE tape and composite resin.
-
-
Fig. 31
Transparent view in Meshmixer.
-

-
Fig. 32
Tooth with hole after Boolean difference operation.
-

-
Fig. 33
Printed and characterized tooth on stock temporary abutment.
-
-
Fig. 34
3-D printed surgical guide.
-
-
Fig. 35
The implant is placed after the manufacturer’s osteotomy sequence has been performed.
Conclusion
Even though particular CAD/CAM systems were used in the workflow described, the user is able to use other open architecture systems and software to develop the techniques. The techniques described in this article can be used in every implant case to guide soft-tissue emergence profiles to achieve adequate esthetics and function; an inadequate emergence profile can lead to food impaction, gingivitis and possible peri-implantitis. The use of CAD/ CAM technologies allows clinicians to have predictable results in a consistent manner allowing the clinicians to also reduce chair time and be more efficient.
Competing interests
The authors declare that they have no competing interests.
Acknowledgments
The authors would like to thank the following companies for their support in this case report and for their support in research, education and innovation: Blue Sky Bio, Medit, Planmeca, Asiga, Roland, Exocad, DESS and SprintRay.
-

-
Fig. 36
Flapless approach and implant placement.
-
-
Fig. 37
Placement of temporary titanium abutment.
-
-
Fig. 38
Pre-surgical provisional restoration pressed to depth in the temporary abutment and picked up with flowable resin.
-
-
Fig. 39
Frontal view of restoration immediately after delivery.
Interview
with Christian Brenes
Why did you conduct the research reported on in this paper?
For what reasons could others cite your paper?
How could your study’s findings have an impact on dentistry?
What is the relevance of your study’s findings to the daily practice of a dentist?
What are your recommendations for further investigation of the topic of your article?
References
| 1. | ↑ | Smith D, Zarb G. Criteria for success of osseointegrated endosseous implants. → J Prosthet Dent. 1989 Nov;62(5):567–72. |
| 2, 5. | ↑ | DeRouck T, Collyns K, Wyn I, Cosyn J. Instant provisionalization of immediate single-tooth implants is essential to optimize esthetic treatment outcome. → Clin Oral Implants Res. 2009 Jun;20(6):566–70. |
| 3. | ↑ | Gamborena I, Blatz MB. Evolution: contemporary protocols for anterior single-tooth implants. → Chicago: Quintessence; 2015. 618 p. |
| 4. | ↑ | Abrahamsson I, Berglundh T, Lindhe J. The mucosal barrier following abutment dis/reconnection. An experimental study in dogs. → J Clin Periodontol. 1997 Aug;24(8):568–72. |
| 6. | ↑ | Lazzara RJ. Immediate implant placement into extraction sites: surgical and restorative advantages. → Int J Periodontics Restorative Dent. 1989;9(5):332–43. |


Leave a Reply
Be the First to Comment!